To What Decimal Place Should the Positions of the Mercury Plugs Be Read and Recorded
Lab Equipment
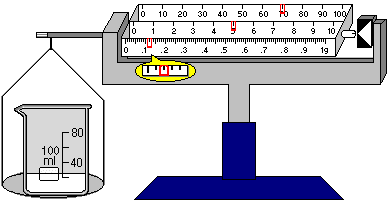
Balances : 3 different balances may exist called from the Equipment bill of fare or by clicking on the pull-downward menu beside the scales button on the toolbar. Any remainder may be set to zero by selecting it and using Zip Residual from the Options menu or from the Right-mouse push context carte du jour. Containers with chemicals may be placed on a balance or chemicals may be added directly to it using the Chemicals dialog box. If any items are on a balance when it is zeroed, the balance volition show goose egg mass and readings taken from that indicate onward volition exist offset negatively by the mass of these items. These balances enable the user to practice weighing techniques. If all that is required is the mass of a container�due south contents, then a weighing calibration may be used. This feature displays the mass of the contents below the container and does not crave whatsoever equipment.
Centigram residue (shown below) has two-decimal place precision and tin weigh a maximum of 111g. In this example, the beaker plus contents have a mass of 75.12g. (Note that the yellow balloon is a zoom that displays the indicator for reading the second decimal identify.) The pan of the centigram remainder may be used to pour or receive the contents of other containers. The centigram rest has three modes: (ane) counterbalanced, when the masses on its arm equal the load on the pan and it is gear up to read, (2) overweight, when the load is greater than 111g, and (iii) underweight, when the balance has been zeroed with a mass on its pan and the mass has been removed.
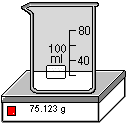
Electronic balance (shown below) has 3-decimal place precision. In this example, the beaker plus contents have a mass of 75.123g. Notation that the container will automatically be moved into position.
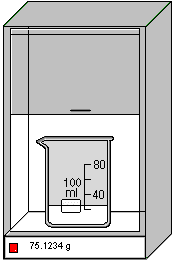
Loftier sensitivity balance (shown below) has 4-decimal identify precision. In this example, the beaker plus contents have a mass of 75.1234g. Notation that the container will automatically be moved into position.
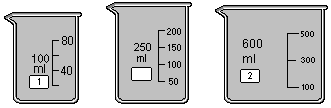
Beaker : wide mouth, thin walled containers with projected lip used widely in laboratory chemistry. ChemLab provides a 100ml, a 250ml and a 600ml beaker. They tin can exist added to the lab space by pressing the toolbar chalice button (100ml), selecting the 100 or 600ml menu items from the equipment menu or correct click on the lab space and selecting the beaker menu item from the popup context carte.
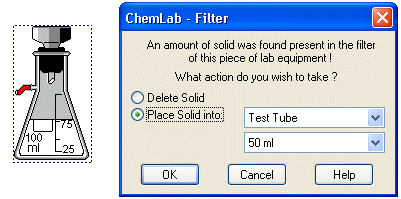
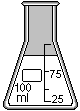
Buchner funnel : a funnel with a flat round base perforated with small-scale holes used for filtering with suction. In ChemLab a buchner funnel is added either by clicking on the buchner funnel from the toolbar, which adds an erlenmeyer flask with bruchner funnel already inserted, or by first selecting an erlenmeyer flask and and so picking the buchner funnel from the toolbar, equipment carte du jour or correct-mouse-push context menu. To remove the funnel, select the erlenmeyer flask and selection the buchner funnel from the toolbar, equipment menu or right-mouse-button context menu. If whatever solid is nowadays in the filter a dialog box will appear asking whether y'all wish to discard or keep and place it another container.
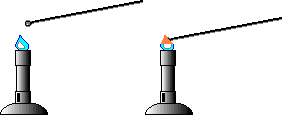
Bunsen burner : a gas burner used in laboratories. Consists of a metallic tube with a valve for decision-making the air-fuel mixture. In ChemLab the bunsen burner is added by selecting the bunsen burner push from the tool bar, equipment bill of fare or correct-mouse-button context popup menu. If a container is selected when the bunsen burner button or menu particular is selected a burner will be added but beneath the selected container. Lab equipment containers, which allow heating, that are place straight above a bunsen burner, will receive a fixed amount of heating from burner. The corporeality of oestrus transfer by a bunsen burner can be varied past irresolute the burner heat in the Equipment Options dialog box.

Buret : a graduated glass tubes with a stopcock valve used for transferring precisely measured liquid volumes. Used in volumetric analysis in laboratory chemistry. In ChemLab a 10ml and 50ml buret are provided. They can be added to the lab space by pressing the toolbar buret push, selecting the buret from the equipment card or correct click on the lab space and selecting the buret menu particular from the popup context menu.
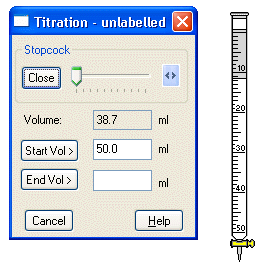
A titration dialog box is opened when a new buret is added. The titration dialog box is used to control the rate of flow leaving the buret. A slider control in the dialog box labeled stopcock is used for this purpose. If an existing buret is selected when the buret push button or carte du jour is pressed no new buret will be added, rather the titration dialog box will so refer to the previously selected buret. To place which buret the titration dialog box refers to, the buret�s label value is added to the dialog box�s menu bar. Note, but 1 titration dialog box can exist opened at a time. The titration dialog box also updates the current volume of the buret to the nearest tenth of a ml and can be used to record the get-go and end-points of a titration. The Volume displayed is either the Actual Volume or the Scale Volume depending upon the setting in the Equipment Options dialog box. Show Actual Volume is the default setting.
Calorimeter : is an musical instrument for determining the amount of rut evolved, transferred or absorbed. In ChemLab it consists of a closed insulated vessel with a thermometer. To add a calorimeter to ChemLab select the calorimeter carte pick in the Equipment primary menu or apply right-mouse-context push button. The calorimeter has a volume of 250ml and will be open when first added. To close a calorimeter, select information technology and press the thermometer tool bar button. This will add both a thermometer and a cork top to calorimeter. Doing this a 2d fourth dimension volition remove the thermometer and open the calorimeter. Note: the calorimeter will only exist available for those experiments in which information technology is used. So the menu option volition ofttimes appear grayed out.
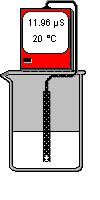
Electrical conductivity Meter : Conductivity is measured by putting a probe in a solution. The meter measures the electric conductance of the solution betwixt two plates. The musical instrument reads direct in units of micro siemens (��S). Temperature of the solution is also displayed in RAW fashion. To employ the conductivity meter, place information technology to a higher place a beaker , select both objects and combine them.
Temperature has a large outcome on electrical conductivity. As the temperature of a solution increases, the electrical conductivity increases. The standard way of expressing the conductivity of a solution is the conductivity at 25 oC . To avert the necessity of bringing samples to the reference temperature, the conductivity meter can automatically normalise readings to a standard reference by using an Automatic Temperature Compensator sensor ("ATC"). To switch from the RAW conductivity way to ATC mode, select the meter while it is not combined and use the correct-mouse push button.
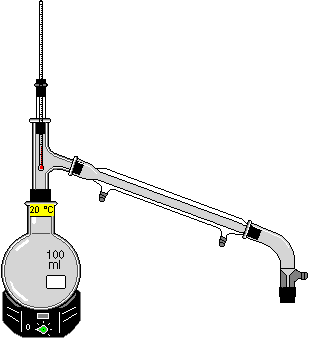
Distillation Equipment : distillation separates the components of a liquid mixture past heating the mixture over the range of its components� boiling points while simultaneously condensing the vapour. The distillation unit requires assembly. From the Distillation Equipment carte du jour under the ChemLab Equipment carte du jour, first select the Circular Bottom Flask (100 ml). Highlight the Round Lesser Flask by clicking on it. From the Equipment carte or from by using a right-mouse click context card, select the Heating Mantel. Likewise, add together the Distillation Head, the Condenser, and finally the Distillation accept-off. To add a chemical to the Round Bottom Flask, highlight the whole unit by clicking on information technology and and so phone call upward the Chemicals dialog box by using the context card or the ChemLab Chemicals bill of fare. The intensity of the Heating Mantel maybe ready either from the context menu or the ChemLab Options menu. Annotation that the Heating Mantel has a red low-cal to bespeak that it is turned on and a green dial to indicate the relative heat intensity. To collect distillate, place a graduated cylinder or a chalice under the Distillation accept-off spout. The Thermometer units may be set to degrees Celsius, Kelvin or Fahrenheit by selecting Equipment under the ChemLab Options carte du jour.
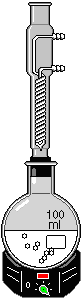
Reflux Condenser : functions like the other distillation equipment insofar as it also separates the components of a liquid mixture by heating the mixture to its boiling point and condensing the vapour. Notwithstanding, the vapour is simultaneously returned to the mixture instead off beingness distilled off. Equally a outcome, the volume of the mixture remains constant while humid. Using the Reflux Condensor with a Round Lesser Flask requires assembly. The associates procedure and equipment performance are the same as the regular Distillation Equipment except that the Reflux Condenser is selected in place of the regular Condenser and no Distillation Head is used.
Dumas Seedling : used to determine vapour density according to the Dumas method. In the Dumas method a volatile liquid of unknown molecular weight is placed in the Dumas seedling, which is of known volume and weight. The seedling is placed in a hot water bath and brought to a boil until no liquid remains. The bulb is so weighed to determine the mass of the remaining vapour. Molecular weight can be determined using the ideal gas police force.
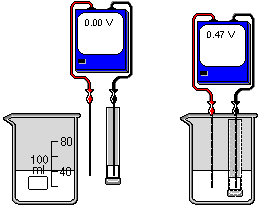
Electrochemical Prison cell : a half-cell assembly that includes a examination tube, two electrodes and a voltage meter. The test tube has a small hole in the bottom. It has been dipped into a hot agar and kNOiii solution in club to form a conductive plug when cooled. The test tube becomes 1 of the half-cells past filling it with an electrolyte and inserting an electrode. The other half-cell is equanimous of a beaker also filled with an electrolyte. By placing some other electrode forth side the exam tube and inserting them both into the chalice, a complete cell is formed. The meter applies a voltage that is equal just opposite to the voltage generated by the cell. This reverse potential holds the redox reactions in equilibrium and enables the prison cell�s output voltage to exist measured at a steady-state. All observations taken at STP (25 Celsius and 100 kPa).
Steps to create an electrochemical cell: 1) Select an Electrochemical Cell from the Equipment menu. ii) Cull metals for the Left and Right electrodes from the drib-down lists in the dialog box. (You can verify or change these by selecting the half-cell assembly and re-selecting Electrochemical Cell from the Equipment menu.) 3) Select the one-half-cell assembly and add at least 4ml of electrolyte to the test tube from the Chemical menu. four) Obtain a chalice and add enough electrolyte from the Chemical menu to encompass one-third of the electrode. 5) Place the half-cell assembly within the beaker by selecting both and combining them. 6) Read the voltage from the meter.
Erlenymeyer Flask : a apartment base conical flask with a narrow neck. ChemLab provides a 100ml erlenmeyer flask. They can exist added to the lab space past pressing the toolbar erlenmeyer flask button, selecting erlenmeyer flask from the equipment menu or right click on the lab space and selecting the erlenmeyer flask menu detail from the popup context bill of fare.
Evaporation Dish : is short wide mouth container with thick walls. ChemLab provides an evaporation dish with a volume of 100ml. They can exist added to the lab space past pressing the toolbar evaporation dish button, selecting the evaporation dish from the equipment carte or right click on the lab infinite and selecting the evaporation dish carte du jour item from the popup context carte du jour.

Eye Dropper : is used to add together drops of liquid to a container. The eye dropper is added to the lab space by going to the Equipment card or using the Correct-mouse click . All eye dropper procedures may exist selected from either the Procedures menu or using the Right-mouse click. To fill heart dropper, select it and employ the add Chemicals or the add H2o dialog box. The centre dropper may also be filled with liquid already in a container. Place eye dropper over container, select it and use Extract liquid. It will be placed in the container and volition automatically remove itself once information technology is full. To dispense drops, place centre dropper over container. To beginning dripping, select Release liquid. If dripping does not occur, enhance eye dropper slightly in gild to ensure that in that location is enough clearance between information technology and the container for drops to appear. To stop dripping, use the Stop liquid/release extraction procedure. Dripping can also be stopped past moving the eye dropper away from overtop of the container and resumed by placing it back over a container. Exist careful not to place it over a container by accident when the Release liquid procedure is set. One drop will range in volume from 0.i ml to 0.2 ml.
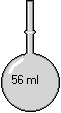
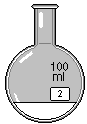
Florence flask : is a round container with a long neck and narrow mouth. ChemLab provides an florence flasks with a volume of 100ml. They tin can exist added to the lab space by pressing the toolbar florence flask push button, selecting the florence flask from the equipment menu or right click on the lab infinite and selecting the florence flask menu item from the popup context menu.
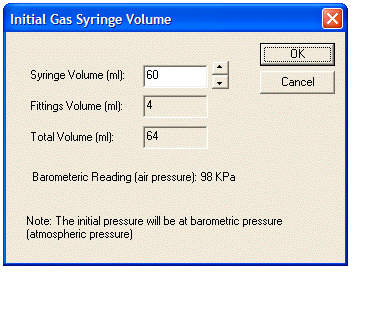
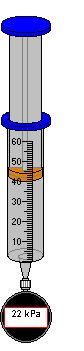
Gas Syringe : is used to investigate the relationship between force per unit area, volume and temperature. ChemLab provides a Gas Syringe with Estimate (60 ml) to written report the relationship between force per unit area and volume at constant Room Temperature (20 �C) and a Gas Syringe Sealed (60 ml) to report the human relationship between volume and temperature at abiding Atmospheric Pressure. When either syringe is selected from the Equipment men, the Initial Gas Syringe Volume dialog box (shown below left) is used to set the initial book of gas at Atmospheric Pressure and Room Temperature. The syringe book is recorded by reading the lower level of the plunger within the syringe.
When using the Gas Syringe with Guess (shown beneath middle, with gauge) some boosted book may be in fittings, such as those used to connect the pressure estimate to the syringe. The Total Volume is a combination of the syringe volume and the fitting book. The pressure level is measured at gauge pressure level, which is container pressure minus Atmospheric Pressure level. The Set Gas Syringe Volume dialog box allows the user to modify the syringe book, which in plow depresses or releases the plunger accordingly. Pressure in kPa is read from the gauge.
When using the Gas Syringe Sealed (shown below right, without estimate) the Initial Gas Syringe Book dialog box is also used to set the intitial book of gas at Atmospheric Force per unit area and Room Temperature (20 �C). However, there are no fittings. Therefore, the Fittings Book is null and the Total Volume is equal to the Syringe Book. Since pressure is to remain constant, the syringe volume cannot be changed using the Set Gas Syringe Volume dialog box. To vary the temperature the syringe is heated or cooled by placing it in a hot water or common cold-water bath. The corresponding alter in volume is read off the syringe. A thermometer tin can also exist fastened to display the temperature of the gas within the syringe.

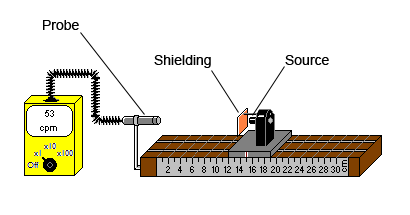
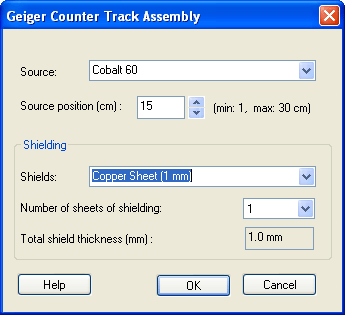
Geiger Counter : is an instrument used to measure radioactive decay disuse. The instrument�south scale reads counts per infinitesimal (cpm). The brandish will update several times a minute. The Geiger counter track assembly allows the user to select a radioactive source and place it in a precise position from the Geiger counter probe. It likewise allows the user to select a number of sheets of shielding to absorb the radiation. The source is independent in the source housing. A ruled calibration indicates the altitude from the Geiger counter probe to the source in centimeters.
When using the Geiger counter you should first determine background radiation and subtract that from the count obtained when measuring the radiation from a source.
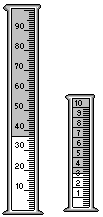
Graduated cylinder : is a alpine cylindrical container with a finely marked scale, used for precisely measuring out liquid volumes. In ChemLab a 10ml and 100ml graduated cylinder are provided. They can be added to the lab space by pressing the toolbar graduated cylinder button (100ml), selecting the graduated cylinder from the equipment menu or right click on the lab space and selecting the graduated cylinder carte particular from the popup context menu.
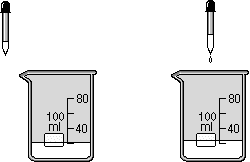
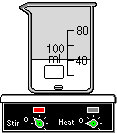
Hot Plate & Magnetic Stirrer : is a piece of equipment used for heating and/or stirring the contents of a beaker or flask. The red lamp on the left indicates that the unit is stirring at the rate indicated on the left-hand dial. The red lamp on the correct indicates that the unit of measurement is heating at the rate indicated on the right-hand dial.
To use as a hot plate , simply identify the container on top of the unit. Note that the container will automatically be moved into position. To regulate the heat, select the unit of measurement with a left-mouse click and then call up the context menu with a right-mouse click. From the Hot Plate & Magazine Stir Options bill of fare, the estrus maybe increased, decreased or turned off. These settings may also exist changed by selecting Hot Plate & Heating Mantel nether the ChemLab Options menu. The oestrus transfer rate may be inverse using the Equipment Options dialog box. The default is 10 Joules/Sec.
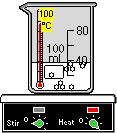
To use as a magnetic stirrer, simply place the container on acme of the unit. Note that the container will automatically exist moved into position and the stirring stone will appear inside the container. To regulate the rate of stirring, select the unit with a left-mouse click and so call up the context carte with a correct-mouse click. From the Hot Plate & Magazine Stir Options menu, the stirring possibly increased, decreased or turned off. These settings may also exist changed by selecting Magnetic Stirrer nether the ChemLab Options menu.
Inverted Gas Buret (l ml) : is used to measure the volume of gas produced in a reaction at Atmospheric Force per unit area and Room Temperature. To fill the inverted buret, place it in a beaker past selecting both pieces of equipment so selecting Combine from under the Conform card or from the Right-mouse click. Once the buret is combined with a container, it is filled with the liquid in the container by using the "Fill up inverted buret" particular from under the Procedure bill of fare or from the Right-mouse click. This volition fill the buret to its maximum volume.

Metal Wire : is used in specific labs to hold a small corporeality of a chemical in place. For example, in the flame experiment, small amounts of water and table salt are held under the flame of a bunsen burner until a colour alter is observed. (The metal wire is fabricated of nichrome.)
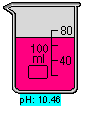
pH Meter : is a display used to measure hydrogen-ion concentration, which is the number of grams of hydrogen ions per litre of an aqueous solution. Since these concentrations are commonly very minor, the measurement is ordinarily expressed equally the logarithm of the reciprocal of the hydrogen-ion concentration of the solution. The outcome can exist used to make up one's mind the solution�due south acerbity or alkalinity. At 25�C, a neutral solution, such equally pure h2o, has a pH of vii; a pH under vii indicates that the solution is acidic, and a pH over 7 indicates that the solution is alkaline. The pH Meter may be added to a highlighted container by selecting pH Meter from the Equipment menu or using the Right-mouse click context menu. The aforementioned procedures may exist used to remove the display. This slice of equipment is not available in all lab simulations. The Titration Curve is a related feature that enables the user to collect and plot acid-base titration data. (Notation: pH is an abridgement for potential of Hydrogen.)
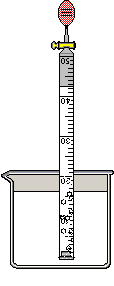
Pipet : is used to add together and remove liquid to and from a container. The pipet is added to the lab space by going to the Equipment carte du jour or using the Right-mouse click . All pipet procedures may be selected from either the Procedures carte du jour or using the Correct-mouse click To fill a pipet, select information technology and use the add Chemicals or the add Water dialog box. The pipet may likewise be filled with liquid already in a container. Place pipet over container, select it and use Extract liquid procedure. It will be placed in the container and will extract liquid until it is removed, until the Terminate liquid/release extraction procedure is used, or until it is full. To dispense liquid, place pipet over container. To starting time liquid flowing, select the Release liquid process. To finish flowing, select the pipet and use the Cease liquid/release extraction procedure. Flowing tin can also exist stopped by moving the open pipet abroad from overtop of the container and resumed past placing it back over a container. Be conscientious not to place it over a container past blow when the Release liquid procedure is set. Shown below are: (a) the pipet in position over a container, (b) the Extract liquid procedure in progress, (c) the Stop liquid/release extraction process fix or when the pipet is total and (d) the Release liquid procedure in progress.
(a)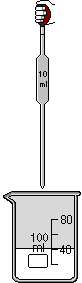 (b)
(b)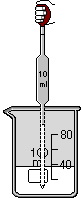 (c)
(c)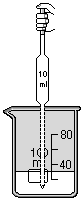 (d)
(d)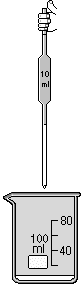
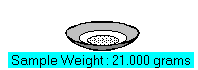
Evidence Weight : in early versions known equally �Weighing scale.� It is used for displaying mass only. It volition prove the sample weight in grams below the container. A weight display may be added to a selected item by pressing the scales button on the toolbar, selecting Show Weight from the Equipment menu or using the Right-mouse click . The weight display is removed from a container by the same process. ChemLab provides balances that may be used to determine the weight of the contents too as the container. These pieces of equipment enable the user to practice weighing techniques. If Show Weight is activated when there is no lab objected selected or when the selected object cannot be weighed, a centigram balance will be added. In add-on, the balances maybe added by clicking on the pull-downward menu beside the scales button on the toolbar.
Stirring Rod : is a glass rod used for mixing. ChemLab allows the addition of a stirring rod for mixing to selected lab containers with some contents. The stirring rod may exist added to a single selected detail by pressing the stirring rod button on the toolbar, selecting stirring rod from the equipment menu or from the popup context bill of fare. A user can too remove an existing stirring rod from a container by this same procedure. The stirring rod will remain in a container for just a few seconds; to continue stirring the user must re-select the stirring rod. If the container is empty, the stirring rod volition appear only will not motion until contents are added.

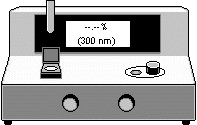
Spectrophotometer : is an instrument that measures the corporeality of lite absorbed by molecules in a solution for a given wavelength. Co-ordinate to the Beer-Bouger Police force the quantity of light absorbed by a substance dissolved in a non-arresting solvent is directly proportional to the concentration of the substance and the path length of the low-cal through the solution.
Beer�southward Constabulary is unremarkably written in the form A=(epsilon)cl, where A is the absorbance, c is the concentration in moles per liter, l is the path length in centimeters, and epsilon is a constant of proportionality known as the molar extinction coefficient. The path length is given to be equal to 1 cm for the spectrophotometer arrangement in ChemLab. The law is authentic only for dilute solutions; deviations from the police force occur in concentrated solutions because of interactions between molecules of the solute, the substance dissolved in the solvent.
Percent transmittance (T) and absorbance are terms used to describe spectrophotometric assay. Percent transmittance is the ratio the corporeality of light passing through the sample to the amount of light applied to the sample multiplied by 100.
% T = [(light passing through the sample) / (light shined on sample) ]10 100
Absorbance (A) or Optical Density (O.D.) is directly proportional to concentration of solute and it represents the logarithm to the base 10 of the reciprocal of the transmittance.
O.D. can be derived from % T co-ordinate to the following formula:
O.D. = two - logten of % Transmittance
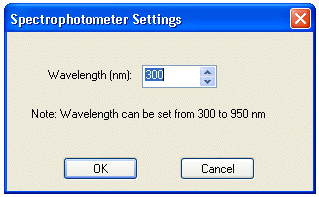
A Spectrophotometer is added to ChemLab by selecting it from the Equipment menu.
This piece of equipment is non available in all lab simulations. The LabWizard includes an option setting for adding a spectrophotometer to a UDL lab.
A user can add together a spectrophotometer by selecting it from the Equipment menu. A spectrophotometer dialog box will appear that allows the user to specify the wavelength. To alter the wavelength on an existing spectrophotometer, first pick the spectrophotometer and once again select the "Spectrophotometer�" menu from the Equipment menu or from the Correct-mouse context menu . The user should assume that the instrument has already been calibrated and is set up for use at this indicate.
A fixed cuvette (10ml) is used every bit a container for the samples. When not inserted in the spectrophotometer, the cuvette will announced above the sample compartment. A sample can exist added to the cuvette past selecting the spectrophotometer and using the Chemic dialog box or by pouring into the cuvette from another container.
The display for the spectrophotometer shows the %Transmission (peak) and the wavelength (bottom). The %Transmission volition be displayed equally "--.--%" when the sample is not nowadays in the sample compartment. To insert the cuvette (or sample) option the spectrophotometer and select "Insert sample" from Spectrophotometer procedures menu (run across principal procedures carte du jour). To remove a sample, use the "Remove Sample" Spectrophotometer procedure. The Spectrophotometer procedure options are also available from the Right-mouse context carte du jour .
Test Tube : a plain or lipped thin glass tube closed at one end. ChemLab provides an test tube with a volume of 50ml. They can exist added to the lab space by pressing the toolbar examination tube button, selecting the examination tube from the equipment menu or right click on the lab space and selecting the exam tube carte du jour item from the popup context card.

Thermometer : is a musical instrument for measuring temperature, it consist of a airtight narrow graduated tube with a bulb at i end. The tube contains a liquid, such as mercury, whose volume varies with temperature. Temperature is indicated by the height of the mercury column within the thermometer.
ChemLab allows the addition of a thermometer to selected lab containers. The thermometer may be added to a single selected item by pressing the thermometer button on the toolbar, selecting thermometer from the equipment carte or from the popup context menu. A user tin can also remove an existing thermometer from a container past this same procedure. The recorded temperature is indicated past the superlative of the liquid in the tube and additionally by a text field at the top of the thermometer. The scale tin be changed from Kelvin, Celsius or Fahrenheit by selecting the temperature scale setting in the equipment options dialog box.

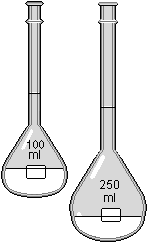
Volumetric Flask: used for preparing dilutions and standard solutions to exacting specifications. A mark on the neck of the flask indicates their precise book. ChemLab provides 100ml and 250ml sizes. They tin be added to the lab space by selecting Volumetric Flasks from nether the Equipment menu and then selecting the 100ml or 250ml menu items.
Spotter glass : is a short circular glass container, used for measuring out solids and other miscellaneous tasks in the lab. ChemLab provides an watch glass with a volume of 50ml. They can be added to the lab space past pressing the toolbar lookout man glass button, selecting the watch glass from the equipment menu or right click on the lab infinite and selecting the watch glass menu item from the popup context menu.

Source: https://www.modelscience.com/help/html/equipment.htm
Post a Comment for "To What Decimal Place Should the Positions of the Mercury Plugs Be Read and Recorded"